
Hello, everybody! It’s not secret that I am cheap, so cheap that I cannot even buy myself a set of dentures or get a shave or haircut. Different people have different priorities and we tend to spend less on things that we do not view as essential to our being and that forces us to make tight decisions on these things to make the most out of our money. For example, instead of buying a pair of expensive shorts that look fashionable I opted for surfers’ shorts so I can wear them comfortably and clean dry them really quick. They last very long and they’re functional, image is only second to utility. I will show you a nice example today that pertains to lenses as far as the Nikon brand goes. It was sold cheap when it came out but there’s nothing cheap with the photos it produces so it has acquired a cult following.
Introduction:
The Nikon 75-150mm f/3.5 Series-E is considered as a hidden gem by its fans despite being a Series-E lens, a line of lenses made by Nikon to complement the entry level class Nikon EM camera. The Series-E lenses were made with cost-cutting as the main factor while maintaining superb optical design and performance. Most lenses under the Series-E brand are good and they have acquired a following so many of them have inflated prices in the used gear market.

It’s a sleek lens with a useful focal length and a decent maximum aperture. I like this lens a lot because it’s small and light. I like the push-pull layout due to the broad grip, this allows me to zoom or focus using without the need to think about 2 separate rings to manipulate. The drawback is most push-pull lenses have this annoying problem called “zoom-creep”, it’s just a name for the phenomenon where the zoom/focusing ring slides towards the camera, throwing your focus and zoom off and it does this un-assisted and gravity is the only force in-play here. Most, if not all old lenses of this type suffer from it to some extent.
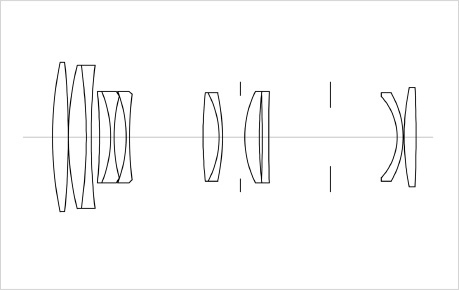
Nikon went all-out on the design. The optics is a marvel of optical design in that Nikon managed to put in so many things in such a small package while maintaining low-cost and high performance.
I would even argue that this lens could’ve beaten true-blue pro-Nikkors in a lot of scenarios. So I advise people who have not bought this lens get one for fun or for pro work. Search Google because there’s no shortage of praise for this lens’ performance.
There are many rumors about it such as this lens being subcontracted to a company named Kiron (a small player) and that the previous version were flimsier when compared to the later ones. Wether these are true or not we shall find out as we go part-by-part in each step of the disassembly so pay attention to the pictures and then decide it for yourself.

Let’s now see some sample photos. Knowing how your lens performs is key to understanding it. You’ll learn to exploit its strengths and avoid its flaws. You can also use them to your creative advantage and I’ll show you how to do that later. I took the next set of photos from both ends of the zoom range and each photo represents a different aperture, from f/3.5, f/5.6 and f/8 (left-to-right) since these are the most common apertures that people will use it and these are the apertures where we see the most changes in the character and image quality of this lens. A lens with a slow maximum aperture won’t show much change as you stop the iris down but it’s still worth looking into.


(Click to enlarge)
Vignetting is terrible at 75mm but it improves considerably by f/5.6. You’re not going to notice it by f/8 and it’s as good as gone. You can’t say the same for the 150mm end, though. It’s not as heavy as what we saw at 75mm and it is concentrated at the far-corners but it won’t go away even at f/8 and you will still see traces of it which is a shame. Distortion is rather high but not as bad as the Zoom-Nikkor 43-86mm f/3.5 Auto. Its distortion at 75mm is of the barrel-type, it’s moderate for a zoom but the shape is a little complex. You’ll get the opposite at the 150mm end, it’s of the usual pinch-type distortion as one would expect and the curvature is a bit deeper but the profile is not as complicated as the 75mm end and will be easier to fix in comp.


(Click to enlarge)
Sharpness is pretty good wide-open at the center and the corners aren’t far behind by much. Stopping the iris down to f/5.6 helps a lot as the resolution is now able to support the lens’ sharpness. Things look really good at f/8, it’s performing near its peak and you get excellent sharpness at the center and the corners look pretty good, too. I did notice that my lens is sharper at the 150mm end, this may be due to sample variation. Any difference in terms of performance is minimal but it’s enough for you to notice when you view the pictures in a large monitor. I didn’t take any photos at 100mm but I suspect that it’s going to be much better than what we see here because the middle of the zoom range is always the best in all zoom lenses.


(Click to enlarge)
Contrast is excellent as expected from a Series-E lens, things tend to be a bit more over-corrected in Series-E lenses to compensate for poorer resolution or other cost-cutting measures. The bokeh quality is mediocre, it’s not great but it doesn’t look terrible either. It is well-balanced and biased towards the good side of the spectrum. I won’t mind using this lens for portraiture at all. It’s surprisingly good for a cheap Series-E lens. The last set was taken at the closest focusing distance of 1m and at 150mm. It’s useful for taking pictures of smaller things which will be handy for wedding photographers since it is capable of taking photos of the rings and the details of the cake without the need to use a true macro lens. Sharpness, contrast and saturation is great at 150mm and f/5.6. Sphero-chromatic aberration isn’t much of a problem but it’s present in small amounts. It’s worst at 75mm and is almost negligible at 150mm where you can’t see much of it.

Here’s how chromatic aberration looks like at 75mm. It’s ugly if I may say so and if this bothers you then you’ll want to shoot this at 100mm or so just to avoid it.

It’s still present at the 150mm but it’s not as bad, this is something that I can live with.


(Click to enlarge)
The biggest weakness of this lens is its inferior coating, the coating used on Nikkors is better and the price reflects that, too. Flares, ghosts and haze can be triggered easily and you can exploit that for some trippy-looking photos.
Let’s now see some photos that were taken in real-world scenarios. I do not base my judgement on boring photos of mundane things but on how much value a lens presents in real-world use and the photos that I can get with it. I took these with a Nikon Df and they’re taken wide-open (I think).

Beautiful saturated photos await you when you know when and how to use this lens. It’s sharp and it’s great for taking candid photos. Despite being on the slower-side, it’s enough to give you decent subject isolation.

Contrast suffers when haze fills your frame. It’s useful for creating vintage-looking photos if you know how to use it but I personally don’t like it much.

The quality of the bokeh is not bad at all but you’ll want to have something faster to blur the background of your subjects.


(Click to enlarge)
This is a nice lens for shooting with a DSLR. It’s still a relevant lens for those who can’t afford better ones that have AF and VR. If you are fine with using manual focus then this lens lens is worth a look.
Let’s now see some photos that were taken with film. This lens was made in the glory days of film and it’s only fair that we judge this using its intended medium. Film has a unique look that’s difficult to simulate and grain helps hide flaws or amplify some other qualities.

This was taken at f/5.6, notice how beautiful the details look. The colors look rich and the rendering looks natural. This is what shooting film is all about.

The colors look much better with film. This, to me is a real photo! The dark corners are caused by vignetting and it adds something special to the photo if you know how to use it.

It’s a decent portrait lens for those who are on a budget. Students will find it fun to use and the lack of AF and other conveniences will force them to use their imagination better. Pity that the background isn’t as interesting as the lady in the frame, this could have been a more interesting candid photo.

I love the tonality that I get using film and despite the higher-than-average contrast that this lens has it compliments this film’s natural-looking tones. I love how this photo looks like it was shot a few decades ago (damn iPhone).

Here’s an example of how the bokeh quality looks at its worst. This is just a poor combination of things at the background. It doesn’t look terrible but it is distracting. I wouldn’t be surprised since this lens was sold for cheap. It’s acceptable in this case.

Spherical aberration helps make the skin “glow”, it’s nice for portraiture. It’s going to give you that nice “Hollywood-style” portraits from the 1930s. Look at the character of the bokeh in this photo. It’s not as smooth as what you’re going to get from the likes of the Nikkor 105mm f/2.5 Ai-S, it looks clumpy in some parts due to over-correction of the contrast.


(Click to enlarge)
Click on the photos and judge this lens for yourself. I personally like this, it’s a well-balanced lens that you can get for cheap and it can create nice photos in the hands of somebody who knows their thing. I rate this higher than the Zoom-Nikkor 43-86mm f/3.5 Ai despite being a cheap Series-E lens.
I highly recommend this lens to everybody who wants a small, useful zoom lens with a practical zoom range. It is great as a travel lens, the reasonably-fast f/3.5 maximum aperture will be enough for most cases except for night photography. People who don’t have much to spend will enjoy this lens, it is still a good lens despite its age specially if you consider how much this thing is being sold these days. Make sure that there’s no play in the zoom and the glass is clean, these are usually found in terrible state and it’s better to pay a bit more for an excellent copy than pay peanuts for one that needs repair. It is one of the best Series-E lenses ever made and even the legendary pioneer Galen Rowell used one to take that famous photo of the Dalai Lama’s palace. If you have the skill and the money, go get one and put all of the gear heads to shame with your plastic zoom and the amazing photos you can get using it and some plastic camera like the Nikon EM.
Before We Begin:
If this is your first attempt at repairing a lens then I suggest that you check my previous posts regarding screws & drivers, grease and other things. Also read what I wrote about the tools that you’ll need to fix your Nikkors.
I suggest that you read these primers before you begin (for beginners):
Reading these primers should lessen the chance of ruining your lens if you are a novice. Before opening up any lens, always look for other people who have done so in Youtube or the internet. Information is scarce, vague and scattered (that is why I started this) but you can still find some information if you search carefully.
I highly recommend that you read my working with helicoids post because this is very important and getting it wrong can ruin your day. If I can force you to read this, I would. It is that important!
For more advanced topics, you can read my fungus removal post as a start. This post has a lot of useful information and it will be beneficial for you to read this.
Disassembly (Focusing Barrel 1):
This lens is going to be dismantled to it’s bare components so that this guide is going to be relevant for people who want to fix other problems outside of the zoom creep issue. This lens is pretty straight-forward with not a lot of gotchas. I will show you where these surprises are later in the disassembly steps so they will not catch you off-guard.
For folks who need to fix the common zoom creep issue, start by removing the front focusing barrel. This is a nice starting point for general overhaul but opening the lens from the rear might be a better option for other issues.
There have been numerous fixes for the zoom creep problem ranging from bandaid fixes to more permanent ones and here they are:
Samples of Temporary Solutions:
- inserts in between the zoom ring and the barrel
- heavy grease applied to the zoom guide slot
The Permanent Solution:
- Replacement or reinforcement of one or both felt linings
This is a zoom and that means that this lens cannot be clearly taken apart in 2 major subassemblies like a usual vintage Nikkor prime (focusing unit and objective). The steps are confusing as I go back-and-forth so please bare with me. I’ll try my best to explain which step should be relevant for what issues but I advise that you also use your own judgement.
Here’s a good article for supplementary reading, you can check out my post about the Zoom-Nikkor 80-200mm f/4 Ai-S. There are similarities with both lenses, if you are familiar with one of them then you can easily take apart the other.
I always work while the barrel is focused all the way to infinity. This serves as a good point of reference I will come back to this at every step.

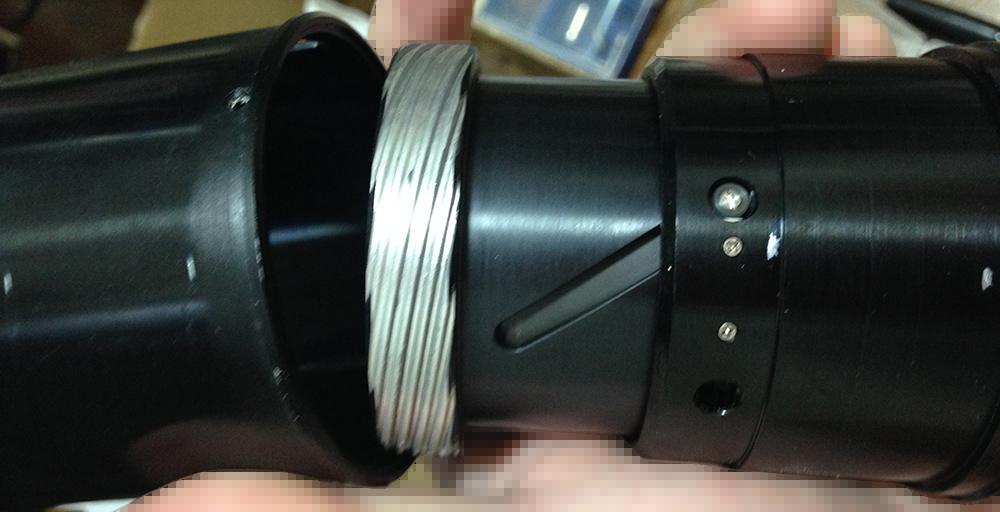
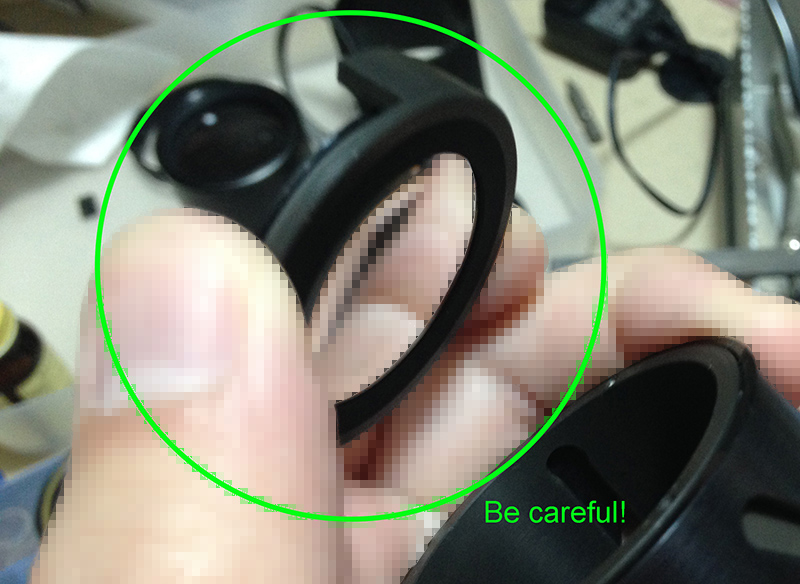
Begin by removing the rubber grip. Be really careful with it because a small puncture can cause this to tear, making this part undesirable, most specially for collectors who value aesthetics over the functionality of a lens.
I removed the rubber sleeve by running a thin rounded wire/rod under the sleeve to loosen the contact cement that they used as adhesive. Carefully go about the whole circumference of the sleeve until it is loose enough for you to pull. Pull slowly and gently as the rubber is old and will rip under stress.
While you’re at it, you can remove the thin brass strip covering the slots for the tiny screw and washer that serve as guides for zooming. This is usually secured by scotch tape and mine was so brittle (due to the age) that the tape literally disintegrated.

Remove the screws of the distance scale. Underneath it is the inner focusing barrel. The distance scale and the barrel is just one piece so I’ll use the term interchangeably. Here is one of the screws.
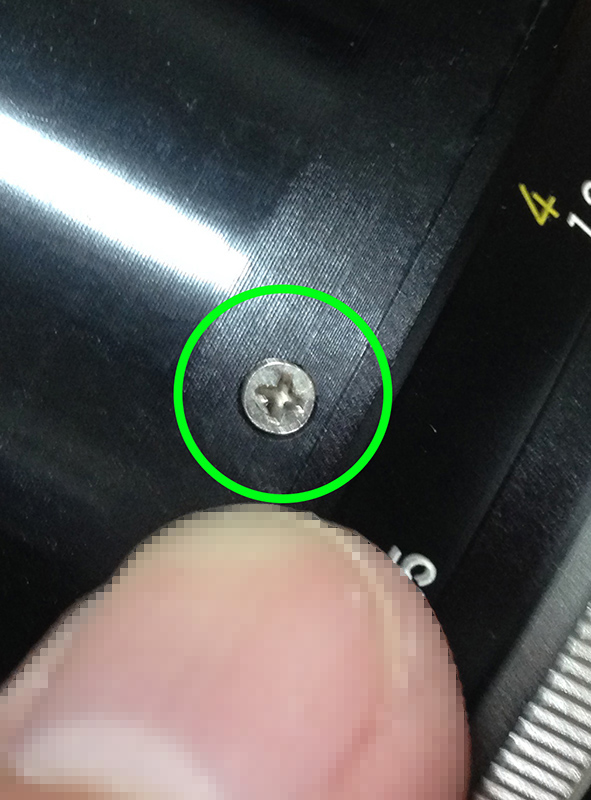
And here’s another.
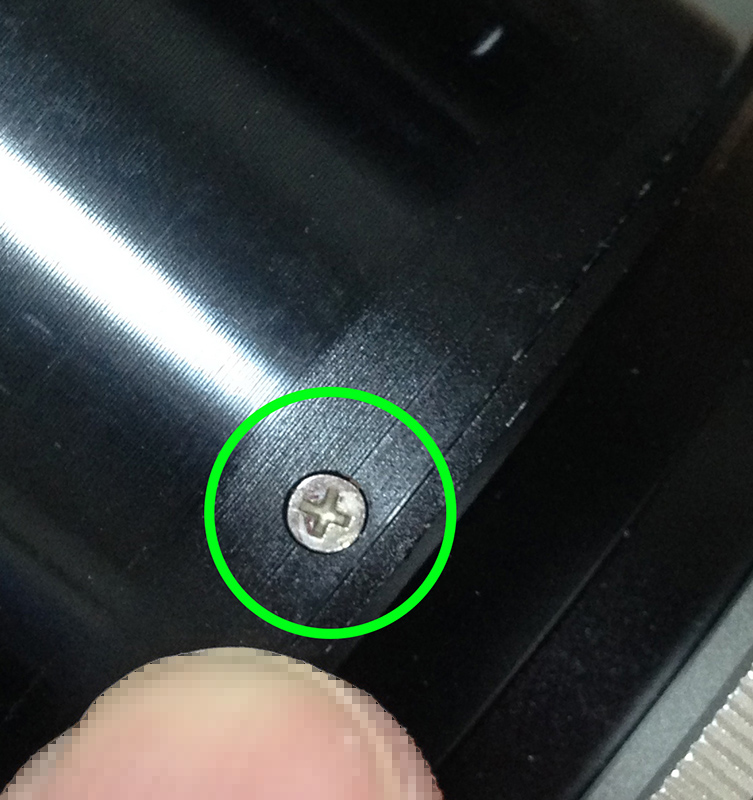
And the last one.

The inner focusing barrel should slide off easily. Before doing this, be sure to mark/scribe the position of the infinity symbol in relation to the focusing barrel as a guide for later.

Remove this screw and washer, keep them in a safe place. This washer has no replacement and can be troublesome to fabricate. It’s also important to mention that this screw should never be over-tightened, but left loose (but secure). Over-tightening it will cause it to squeak when you zoom in or out even if you apply a spoon-full of grease.
Disassembly (Helicoid):
You can skip anything related to the helicoids if you only need to repair the zoom creep issue since these are accessible, I highly advise that you service the helicoids as well because doing so will give the lens several more years or even decades before you need to change the grease again. This will also fix another known issue with this lens, loose focusing.

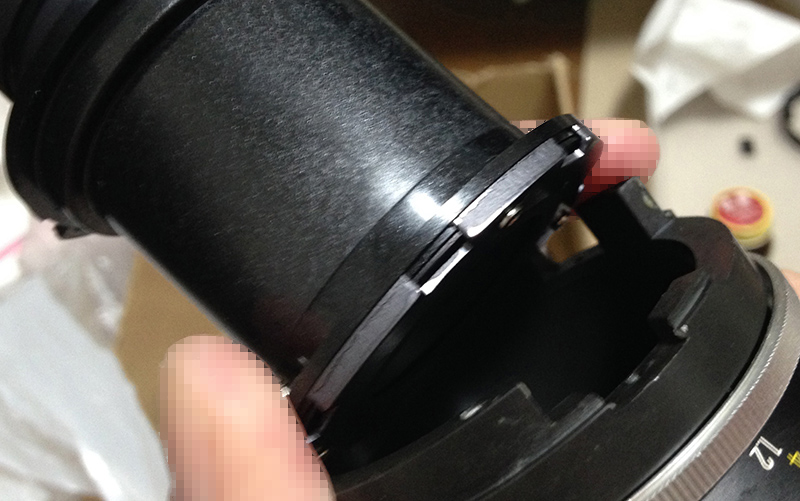
You can simply unscrew the helicoid at this point. Please be careful because this will part in just a few turns. The front barrel is connected to the outer helicoid so it goes off as well.
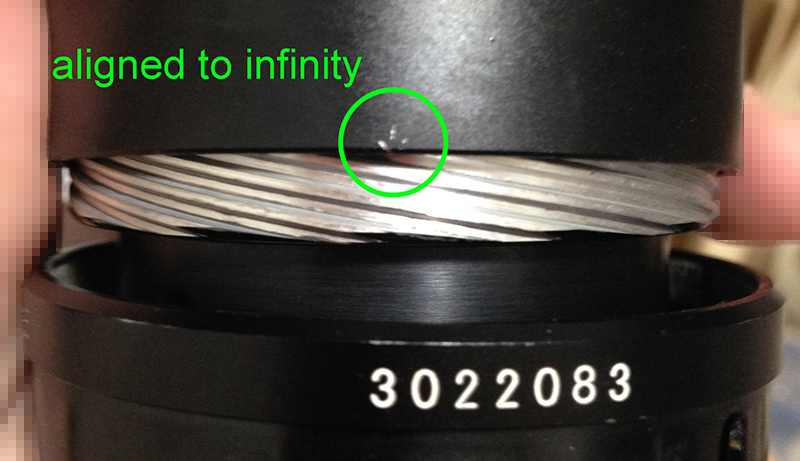
As with all helicoids, you should mark where they separate. It’s also worth noting that in my sample, the number “3” at the start of the serial number in focusing barrel coincides with where the infinity mark should be. This was convenient for me when I was re-assembling my lens. I don’t know if this is also the case for other lenses. If you are new to this, read my article on how to work with helicoids to avoid any mistakes.
The helicoids look dry as if grease was never even applied to this part. That explains why this thing was not even damped as you turn the focusing ring, there was no resistance at all. This may be what some people want but I like my focusing to be damped even if I want my lenses to be feather-lite when I turn the focusing ring.
Now that the front barrel is off the focusing barrel comes off easily. You can now access the inner parts so you can fully disassemble your lens.
Disassembly (Focusing Barrel 2):
Back to the focusing barrel. This step can be confusing so please bear with me. The inner focusing barrel can be a pain to dismantle and access. If you are not comfortable with it after reading this article, you can simply skip it and work on the outer focusing barrel since you can repair the zoom creep problem by just working on the felt lining found on the outer zoom ring.

Under the barrel you can find this felt strip. Mine was about 3mm thick and looks OK so my lens does not have any severe zoom creep going on. If yours have it, this is the part that you should replace/re-pad. A simple lining made from a thin strip of brass is more than enough to raise this so it will grip the barrel more. Replacing this part with something else is also an option if you found that yours is in a bad state, only a replacement is viable.
Note that this is only one of two parts where you can repair the zoom creep. The other one can be found in another barrel and can be a pain to remove. If fixing this lining helps then you probably do not need to go too far unless you want to do a thorough job.

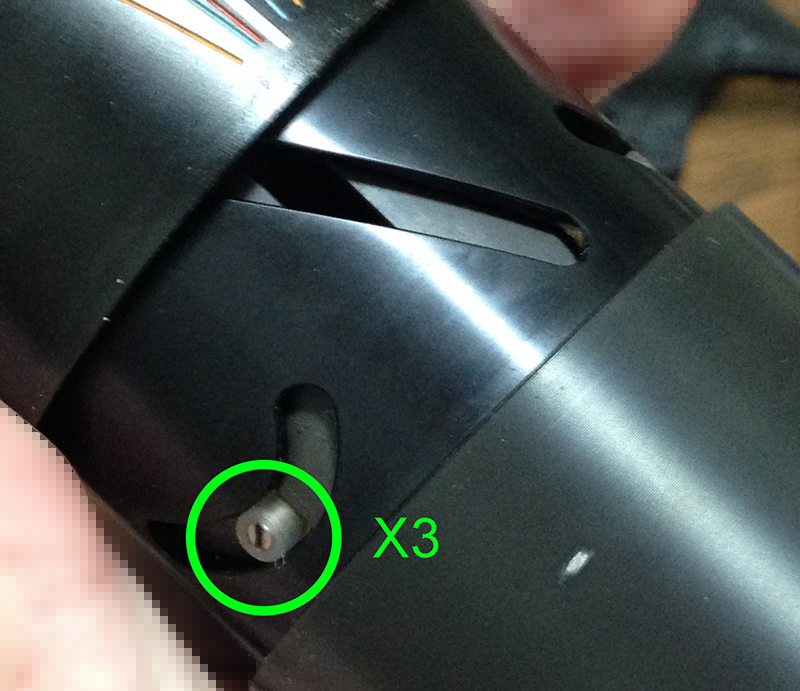
To remove the inner helicoid from the main barrel, extract its 3 screws. You should also note where the small indent should align with the barrel so you can align this perfectly as you re-assemble it. Align it with a stationary part such as the chrome grip or anything that doesn’t rotate so that the position is constant as you go about rebuilding your lens. Another way is to mark the position of this indent on the surface underneath it (on the main barrel).

When you remove the helicoid make sure that you don’t lose or damage the brass shim under it. It’s used as a washer or gasket of some sort. These brass shims are usually used for focus calibration but I don’t think that this is the case for this as it was found in a place that is not accessible or convenient at all for calibration.
Focus calibration on this can be done on the front barrel, I’ll show you how and where to do it in later steps.

You can remove this element and its casing by using a lens spanner.

And off it goes, be careful not to drop it to the floor.

Removing these screws will free the helicoid stop under it. It isn’t necessary to remove the stop but I didn’t know what to expect when I was repairing it.
You can also see 1 of the 3 zoom rollers™ in the picture (I invent names as I go). This part can get confusing so read the next step carefully.

You should remove these rollers to separate the inner focusing barrel from the main barrel. If you look at the picture, one of the rollers is shorter than the other 2. The reason why one is shorter is because the shorter one slides under the stop and the 2 longer ones serve as bumpers. Now that you know what these do, you can conclude that the shorter one should lie between the 2 long ones or else the focusing ring will not turn properly because the stop is being obstructed.
As a guide to where these should be positioned, think that the longer ones should be positioned at both ends of the focusing range, one at infinity and another at the minimum focusing distance. Of course, the short one should be in between these.
Be aware that these rollers secure a cam and removing these frees that part and there is a potential that it may damage another element under it is high so please check the next steps to see what I mean.
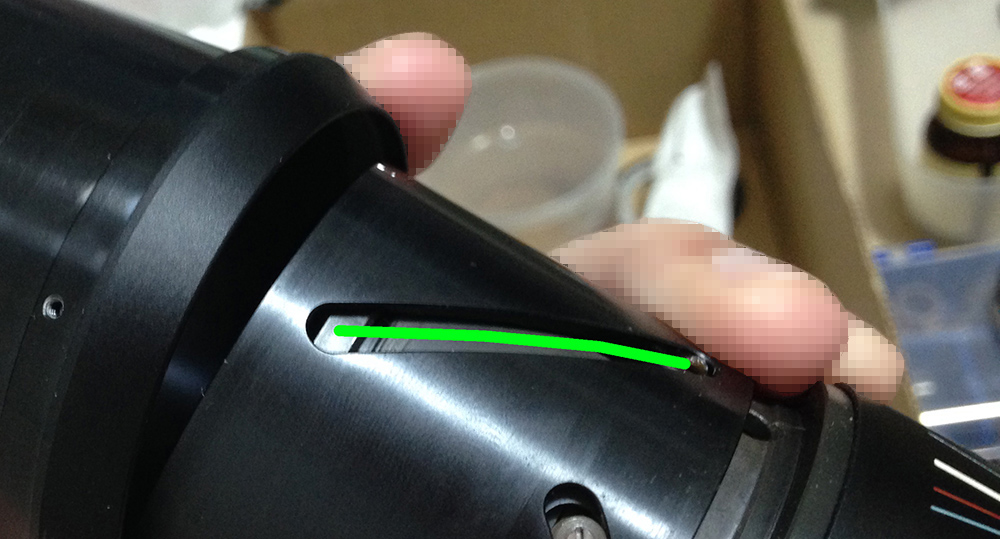
Now that the rollers are off you can separate the inner focusing barrel. The line in the picture show where each roller travels when you zoom the lens. This should give you an idea as to how much grease you should put into this slot, never put too much grease here and just a thin film is enough.
Seen in the picture is yet another roller that belongs to another set of rollers that is used for focusing, I’ll call these focusing rollers™. These are used to keep the cam in proper alignment as you focus in and out.
The zoom rollers™ that you just removed are all connected to this part. This part is used to house the floating element that we just removed a few steps ago. This thing moves in or out as you zoom the lens.

Same thing with the outer focusing barrel, the inner focusing barrel has a felt lining under it, too. If you are only interested in fixing the zoom creep then you can simply replace or fix this and ignore the rest of this post and just read it for educational purposes.
A note about removing the rollers. Be careful not to strip their slots, they’re easily-damaged so you should use a driver that fits perfectly. If they’re stuck just drop some alcohol or heat the other end with a soldering iron, that will soften the seal and make it easier to remove them.
Disassembly (Rear Parts):
This step isn’t essential for people who simply need to fix the zoom creep so you can skip this part unless you need to do a complete overhaul or fungus cleaning. My lens’ iris didn’t need to be serviced so I didn’t bother to open it.

Remove these screws to extract the bayonet mount. Be careful not to scratch the glass.
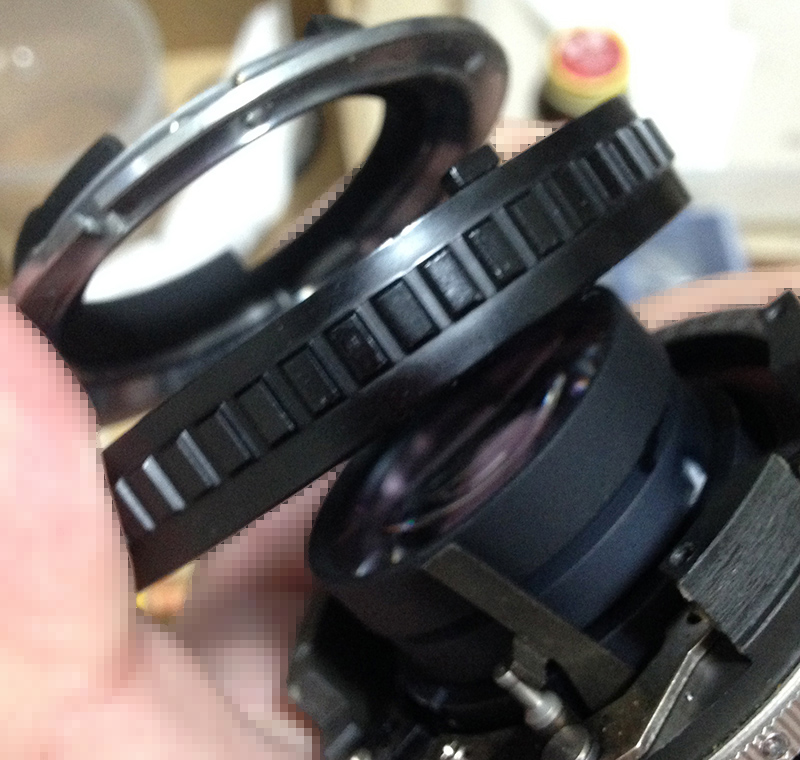
The aperture ring and the bayonet should come off easily but be careful so you won’t lose the small parts underneath it.

The aperture ring also houses the detent mechanism. I was lucky that Nikon used a heavy grease (something like lard) on this very part so mine did not jettison across the room. Nikon sure went cheap because the aperture ring is made of plastic and the detent mechanism is kind of rudimentary.
The spring should go into the hole, the small bead/ball bearing should sit on top of it. It can be challenging to put back together, you will see for yourself later.

To remove the rear optical block simply remove the screws securing it but before doing so, remember to mark the alignment by scribing a mark on the surface of the main barrel and rear optical block. It’s a precise alignment so be careful. I just scribed a single line, that’s enough for me to know how this should align later.
Nikon used plastic on this part. While this is adequate, it shows where and how Nikon went cheap in order to make this affordable.
The rear optical block should come off easily. Also be careful not to drop the whole thing. The rear elements can be accessed by removing the retention ring. This ring is generously glued so use some acetone to soften up the seal before you proceed.
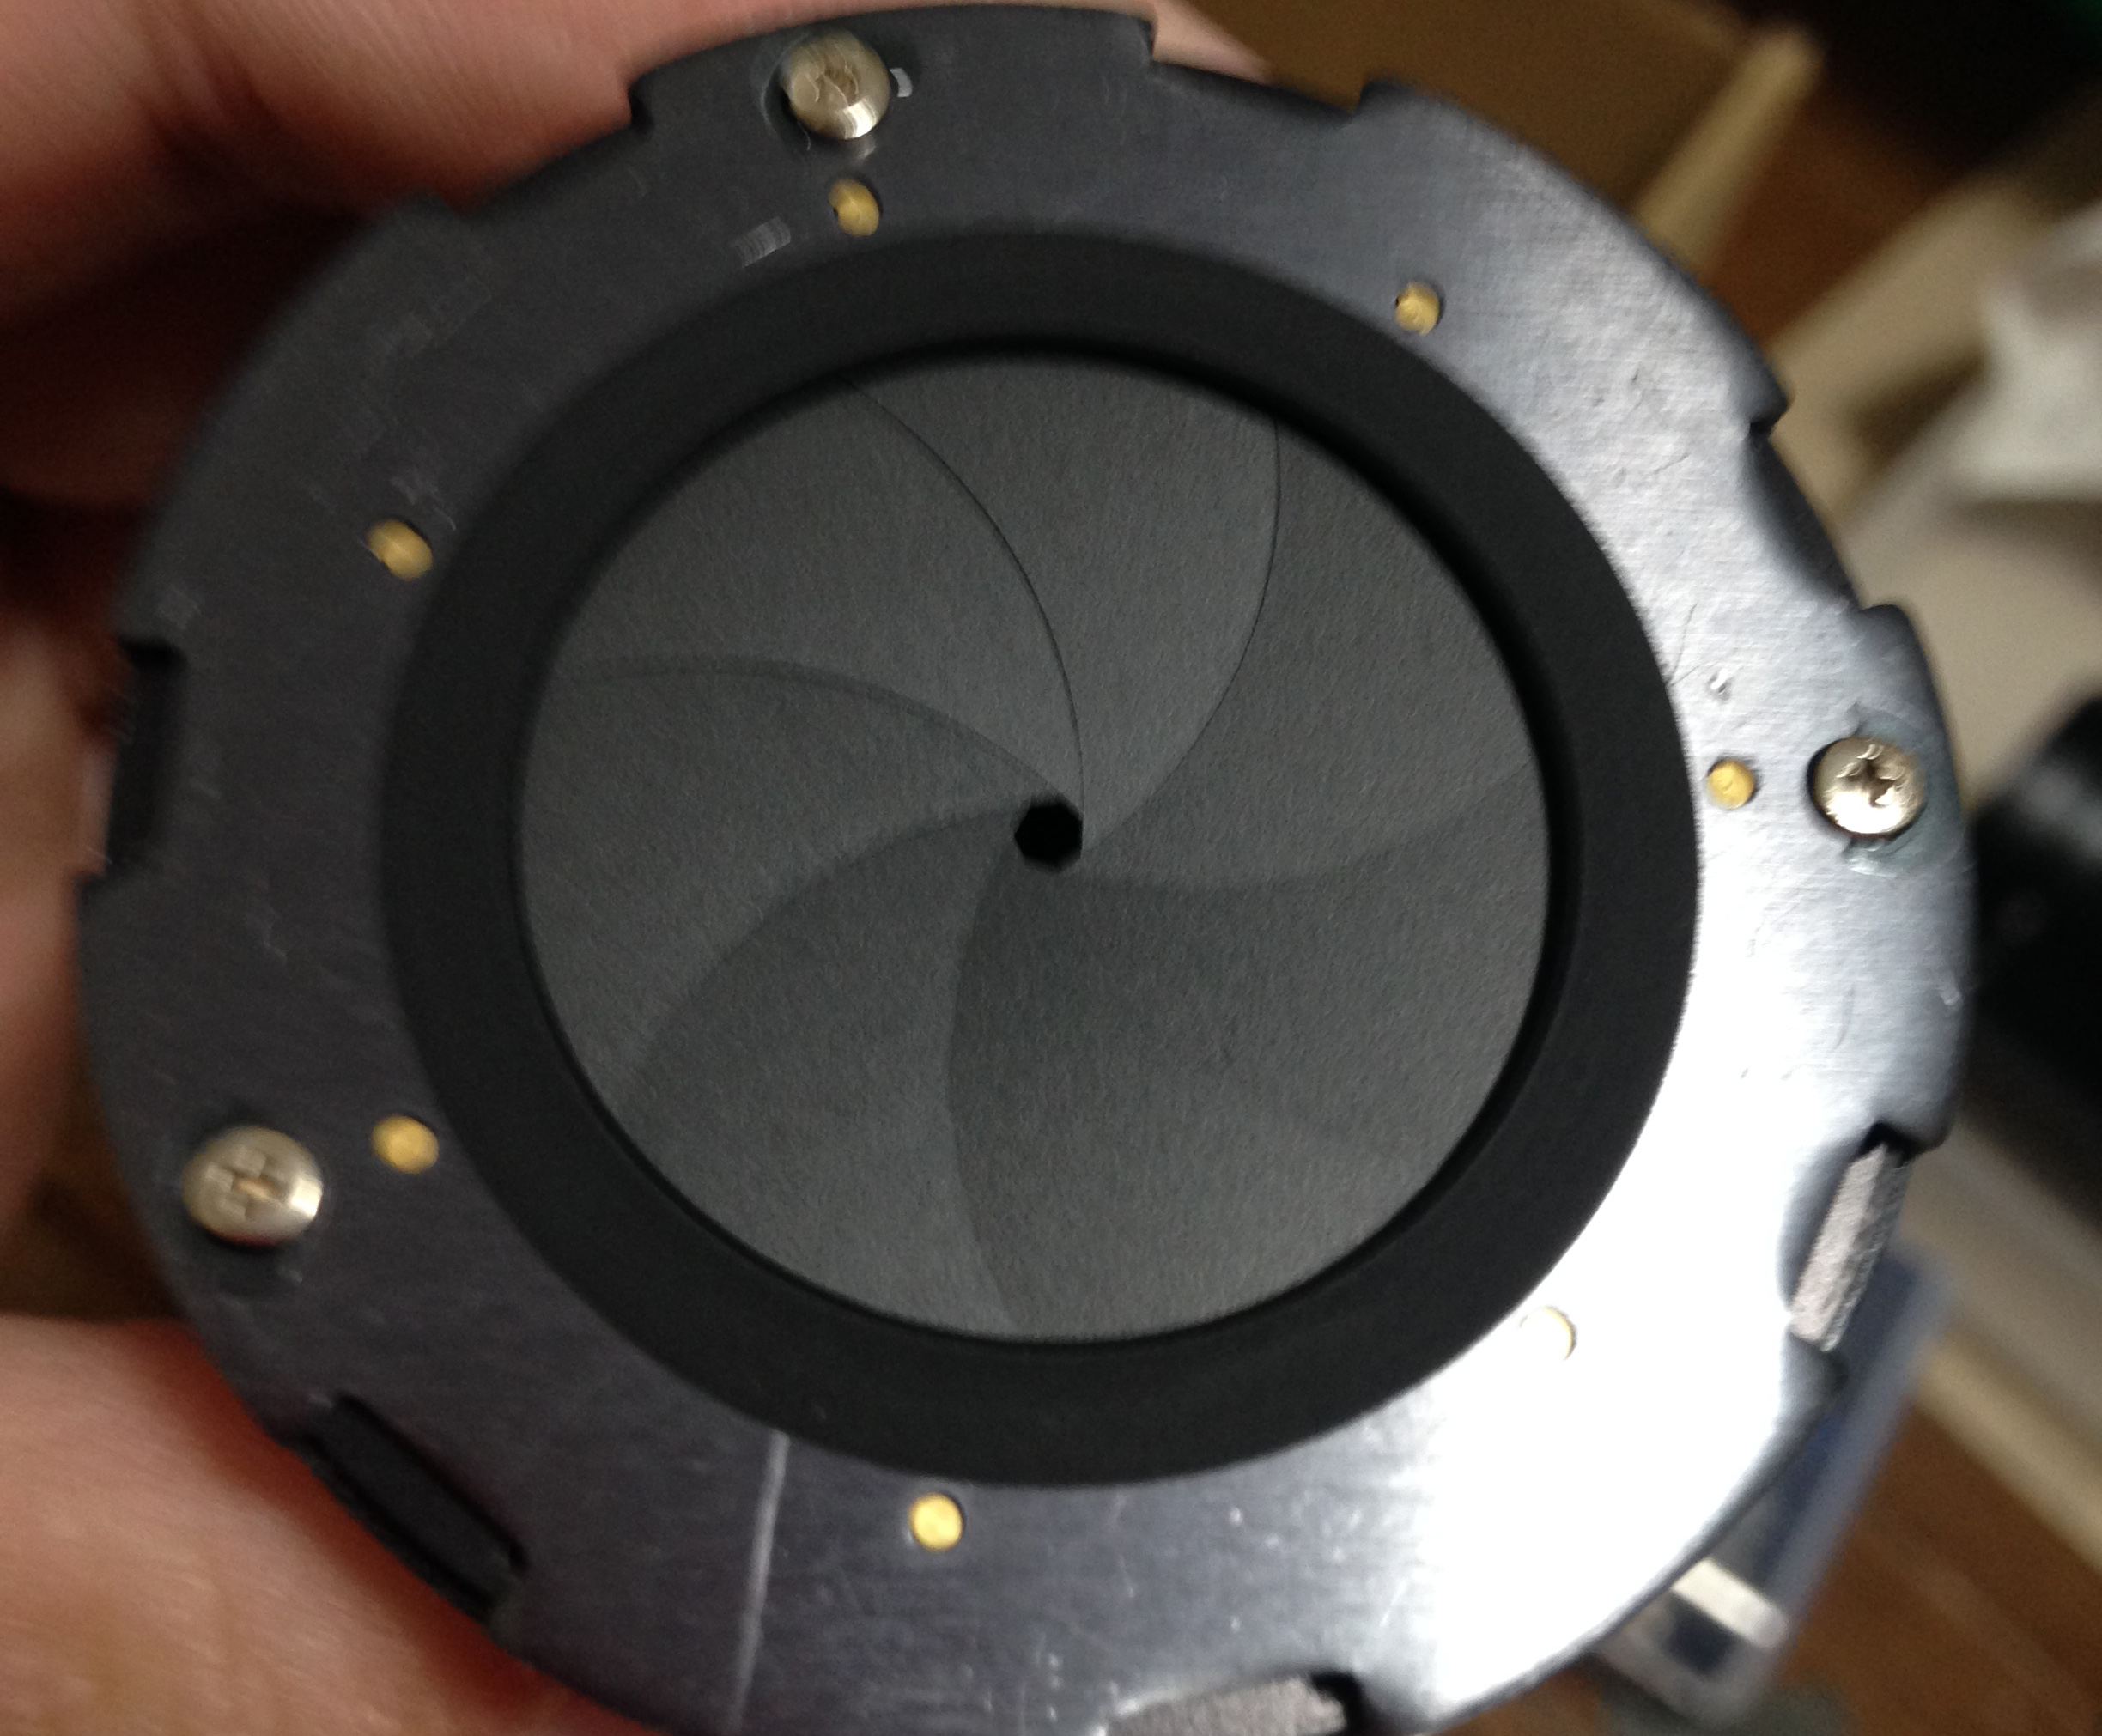
Also be careful when handling the rear optical block because at this point the exposed iris assembly can easily be damaged. Just check this thing out, the metal plate that secures the rotator plate and aperture blades inside is just made of stamped metal. On a Nikkor, this part is usually milled from a single piece of alloy.

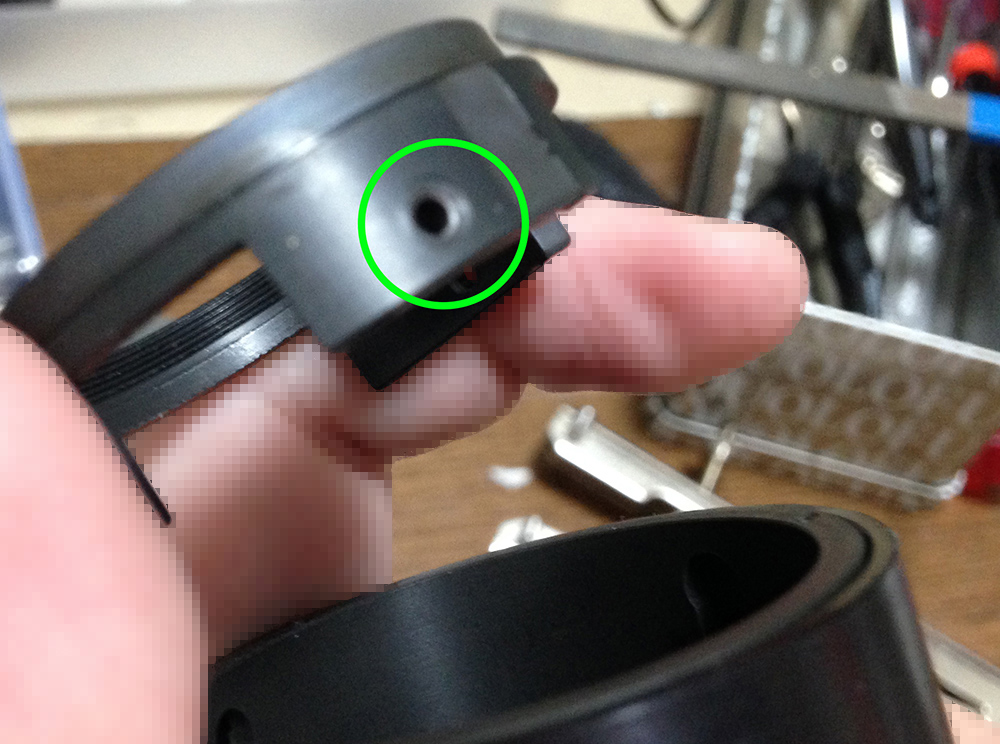
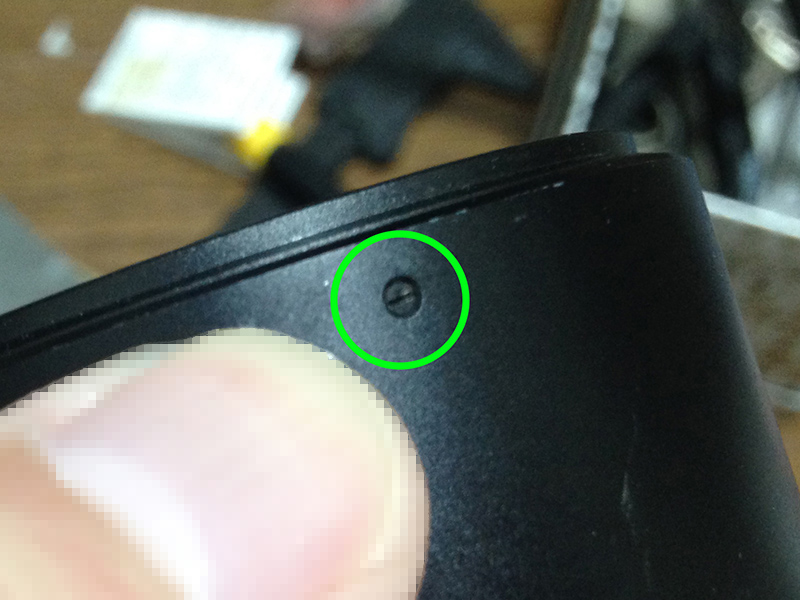
Remove the chrome grip by removing its screws and you should be able to easy slide it off. The circle shows one of the 3 screw holes.
Disassembly (Other Stuff):
I did not know where to categorize these parts so I consolidated these here for convenience. For those who are only interested in the zoom creep issue, you can skip this part because these have nothing to do with that problem.

To remove this protective sleeve, just extract these screws.

It simply slides off without any problems. These things aren’t usually glued to the main barrel if there are screws securing it otherwise Nikon will glue these things and it can be annoying to get these off if they did.
This sleeve is actually more cosmetic then protective and you can just leave it there, if you want to clean your lens thoroughly then removing this part is a must because this part usually collects dirt and grime underneath it.
Remove these focusing rollers™ so you can proceed. Unlike the rollers from before, these rollers all come in the same length so don’t worry about where and which way these should go. Look at the next step so you’ll be aware of what happens when you remove these.
The rollers hold this floating element in-place. Exercise caution to prevent an expensive accident from happening by making sure that this thing does not drop to the floor.

This guide barrel simply slides off now that all of the rollers are gone. This barrel mainly serves as a guide for all of the 6 rollers. You can now see and appreciate the main barrel. The main barrel is milled from a single piece of alloy and looks expensive to manufacture. Nikon went cheap on most parts of the lens but they sure spent money on the most important structural part of this lens.
Clean everything very well and make sure that there’s no residue. You don’t need to apply grease to anything and if you do then just apply a thin film. It is usually enough and adding more grease than you need is detrimental, it’s going to end up contaminating the glass in the future.
Disassembly (Front Elements):
This step has nothing to do with the zoom creep problem. For the folks who simply need to clean the front elements or calibrate the infinity focusing of this lens, this is it.
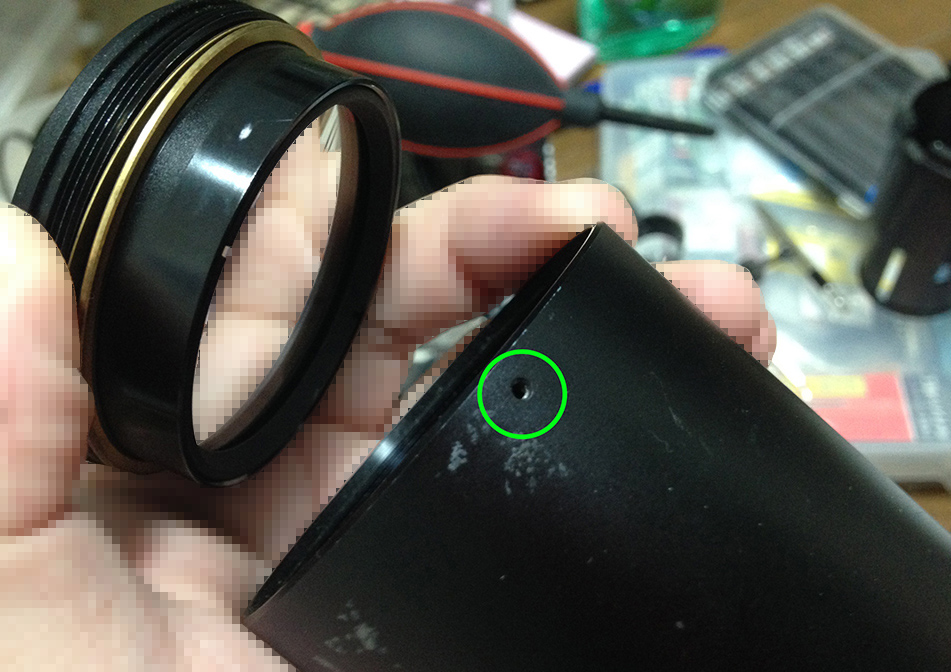
Loosen up this screw to remove the front elements assembly. Be careful not to damage this because this is non-standard and can be expensive to source.
Simply unscrew the front elements assembly off. Be careful not to damage the screw hole. The front elements assembly can be opened up by using a lens spanner. I used a lens sucker to safely remove the front element.
You may want to be careful with the acetone since the front elements were cemented together with Canada balsam and you do not want that part to get damaged accidentally by contaminating them with acetone or solvents.
There are shims under the front elements assembly. These brass shims are there for adjusting the focus of your lens.
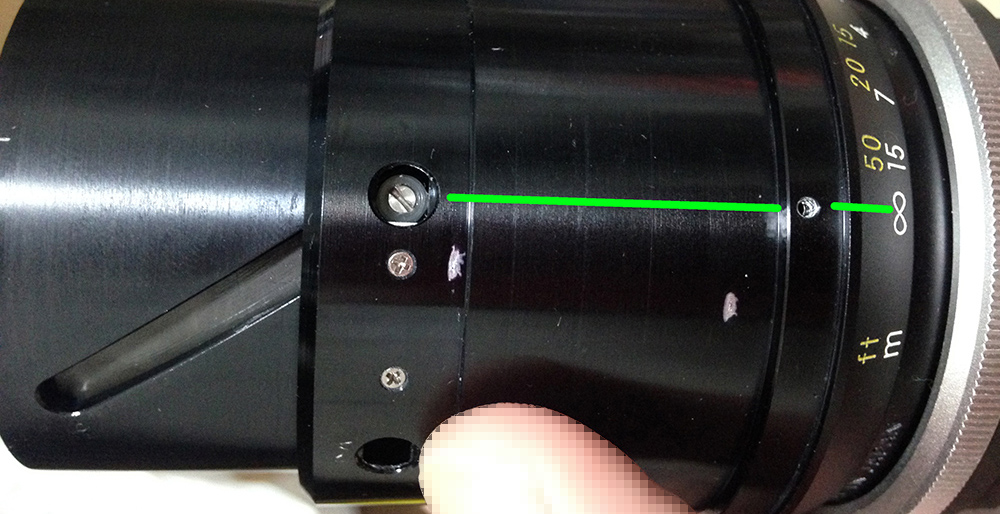
This is the part that you adjust if you need to fix the lens’ focus. If your lens focuses past or short of the infinity mark (at infinity) then all you need to do is loosen the screw on the previous step, turn the front elements assembly until your focus lands exactly on the infinity mark and then tighten the set screw again so that the front elements assembly stays put.
It’s worth noting that this lens exhibited some focus shift as you zoom in or out while focused at infinity. All this basically means is that when the lens is focused all the way to infinity and focused on a distant object, the focus dot is solid at 150mm but when I zoom to 75mm, the dot flickers. I calibrated it to focus perfectly to infinity at 75mm and then the problem presents itself on the other end this time. Having this in mind, you decide which end of the lens (75 vs 150mm) is more important to you at infinity. This isn’t a big deal since a flickering dot still meant that the lens is still in focus somewhat, for me that is “close enough”. You can fix this by adjusting some of the elements and their position but that will take a long time.
As mentioned in the commentary, one of the 2 longer rollers should fit into the screw hole that corresponds to the infinity mark. The other one should be installed on the 1m mark. The shortest one should be placed in between the 2 long ones.
This part (the rollers) is the only confusing part of the whole process so take your time documenting each step, refer to this blog if you missed anything just in case. It isn’t frustratingly difficult but it might take longer.
As usual, I soaked all of the metal and hard plastic parts in an alcohol bath so that any dirt or grime will be softened enough for me to wipe off using a clean lens tissue. I do this because simply wiping the surfaces with solvents and tissue isn’t enough to clean grime that has deposited and hardened over the decades. Wiping alone will also not be enough to reach stubborn dirt on the corners and crevices. I usually soak these for a few hours to overnight depending on my mood.
Conclusion:
I would put this on the easy side if you are an experienced repairman. I was expecting this thing would take me 2 nights to overhaul mechanically but I only spent close to 3 hours fixing it.

As you can see from the picture, the lens now looks clean because I took the time to clean everything including that broad rubber grip. The rubber grip was cleaned with a toothbrush. You can scrub this with dishwashing liquid if yours is really dirty just be sure to use unscented ones or you’ll leave oily residue on the rubber due to the oils used for fragrance or moisturizers.
Most of those who asked me to do a tear down of this only needed to fix the zoom creep so I would advise them to also re-grease the helicoid while they are at it. I used a stiffer grease on mine (S30) because I wanted mine to feel a bit more damped. While the front/middle elements are accessible, it’s also a nice idea to get a blower to clean any dust that have settled on them.
Thank you very much and as always, if you have enjoyed this it would help me a lot if you share or re-post this. If you have benefitted from this, please consider supporting my work to help me offset the cause of running it. Until next time, please stay healthy, may you find a great deal in your junk hunts, Ric.
Help Support this Blog:
Maintaining this blog requires money to operate. If you think that this site has helped you or you want to show your support by helping with the site’s upkeep, you can make a small donation to my paypal.com (richardHaw888@gmail.com). Money is not my prime motivation for this blog and I believe that I have enough to run this but you can help me make this site (and the companion facebook page) grow.
Buy me a roll of film or a burger?
Thank you very much for your continued support!
$2.00
Helping support this site will ensure that this will be kept going as long as I have the time and energy for this. I would appreciate it if you just leave out your name or details like your country’s name or other information so that the donations will totally be anonymous. This is a labor of love and I intend to keep it that way for as long as I can. Ric.

Oct 02, 2016 @ 17:31:15
Thanks for the great article and hard work that went into it. Did you find any evidence to support the rumour that this lens would have been made by Kiron? Personally I think it is mainly a myth as it has been perpetuated mainly by one or two pseudonyms of various forums now for years but without any evidence to back it up. Out of curiosity I would love to hear your take on this issue after disassembling the lens. Not that it matters in the end who made it as it is a great lens nevertheless!
Oct 03, 2016 @ 09:19:01
Hello, Aleksi!
Glad that you liked the blog. having opened this lens, I did not find a lot of differences in it’s engineering to point that this lens came from another maker. It might be, there is a possibility but until Nikon says anything, it is only speculations. I can try to find anything on the Japanese internet and see if something can shed some light into this.
It is a great lens! Unfortunately, I am not a zoom lover as I prefer primes for a multitude of reasons.
Ric.
Apr 28, 2023 @ 15:46:44
A wonderful little zoom that produces very nice results. However, I prefer the Kiron 70-150 f/4. It’s smaller, better built and every bit as sharp as the Nikon version. It also doesn’t develop the horrendous zoom creep that the Nikon is known for.
Russ
Dec 21, 2016 @ 23:33:08
Richard, thank you very much for the great article!
I read it because I recently bought a Vivitar 70-150mm F/3.8 (with Canon FD mount) like the one shown here http://www.ebay.com/itm/Canon-FD-Fit-Vivitar-70-150mm-F-3-8-Manual-Focus-Zoom-Lens-Ex-/361836555337?hash=item543f23ac49:g:ruYAAOSwiONYNZ6B
Unfortunately it turned out that focusing doesn’t work on my lens at all. The push-pull zoom works. The focusing ring turns easily (though it goes about 1cm beyond of infinity mark), but no focusing happens. It seems that none of the optical elements are moving inside of the lens when I turn the focusing ring.
Can you please give me some hints about what do I need to check first in order to get the focusing working? How far may I need to go in disassembling of the lens to make it work?
I don’t have any experience with lens repair, so as a beginner I would prefer to not touch things which are not necessary for the repair 🙂
I have googled my lens on web and in youtube and unfortunately didn’t find any repair-related articles or videos. So I even don’t know how many groups does the lens have and which of groups should move during focusing, but I think its design might be similar to Nikon 75-150mm f/3.5 Series E.
Thank you in advance!
Dec 21, 2016 @ 23:51:34
Hello, Oleg!
I am not sure about the Vivitar but the construction should be similar to the Nikkor. If you can remove the rubber grip from the Vivitar, you should see a small square copper washer. It is very delicate and small so it might have gone loose. There are a few things that can happen to make your lens like that. Another one is the front part, maybe some screws came off. Ric.
Dec 22, 2016 @ 21:50:48
Thank you, Ric, for your answer!
I have “primed” the rubber grip and it looks possible to remove it, so I will check what is underneath.
The lens has also a bent filter ring. So the lens might have been dropped and it could somehow affect the focusing function. First I need to fix the filter ring, because it’s currently impossible to take name ring off the lens.
Thank you again, and merry Christmas to you and to your family! 🙂
Dec 23, 2016 @ 00:26:39
Hi, Oleg!
there is a way to fix that. One is to buy a filter vise and another is to just hit it with something like a wooden stick. Ric.
Apr 01, 2017 @ 23:16:12
Hello! My screw in your 7th picture (the one that fits in the tiny washer) seems too short. Do you know what size that screw is? I would like to get a replacement, but don’t know the size.
Thanks,
Tony
Apr 02, 2017 @ 01:24:46
Hello, Tony!
You mean the screw that holds the nut in place for the thrust action rail? The nut is hexagonal is it? Is it too short that it cannot reach into the nut? That is unusual and it might have been tampered with or you might have jumbled up the screws.
I forgot how big they were but I discussed the standard sizes for Nikon screws in the article above. If I am correct, it may be the standard M1.4 screw and at the biggest, the M1.7, be careful with the correct pitch by the way.
Apr 03, 2017 @ 01:13:22
Hello! Yes, that’s the screw. I got the lens used and the focus ring had significant side to side play. When I removed the rubber and thin metal strip, I found that the screw wasn’t screwing into the hole. I’m thinking the previous owner banged the focus ring against its limit, thereby loosening the thread (essentially it may be stripped). I was thinking of getting the next sized screw and tapping it in. Any other ideas to remedy it?
Thanks,
Tony
Apr 03, 2017 @ 01:58:04
Hello, Tony.
Wow, that sucks! If that is the case, you will have to see if the thread is still OK. You can test it by trying to screw-in a good screw of the appropriate size (M1.4/M1.7) and if it screwed in neatly then the thread is still OK. Otherwise, you will have to re-tap it just like what you said but be careful while doing so. It might be better to fabricate a new nut by filing a similar nut into the correct width. That was a damn hack job you got there. I ruined my helicoid stop once and my hack job wasn’t that sloppy. Ric.
Jan 08, 2019 @ 12:42:09
The reason the screw isn’t reaching is, I suspect, that the nut is countersunk on one side – you need to look carefully and make sure you have it right side up.
Apr 27, 2017 @ 03:59:57
Richard,
I found your blog post the evening I decided to take apart my 75-150mm Series E. Zoom creep isn’t the main reason, as I could easily live with that, but a random tendency to produce partially out of focus images, especially at the longer focal lengths. I have not been able to determine what exactly causes it, but I am guessing there is enough lateral movement in the lens due to worn out felt that allows the front element to shift enough to get out of alignment. I don’t really know the mechanics of all that very well, even after studying your images. Also, the out of focus area is usually only the left third of the image. Nothing dramatic but clearly visible even at lower resolution than the original – e.g. here – compare trees top left with center https://flic.kr/p/Jo5Xqs
detail crops at full sensor resolution left side
https://www.flickr.com/gp/speedcenter/3945Ew
image center
https://www.flickr.com/gp/speedcenter/01K0od
Where would you suspect the lens to be failing when images only from time to time are out of focus on the left side? The examples I have are all at infinity. I could do some controlled tests at shorter focal distances to see if I can induce the problem just by holding the lens barrel in different ways, but perhaps this is something you can already diagnose based on what I told you here.Obviously, I’d love to hear that this is just a loose lens barrel symptom.
Apr 27, 2017 @ 04:06:15
Hello, Peter!
an unevenly focused image is an indication of only 1 thing! One of more elements in your lens is misaligned, has the lens been dropped or serviced by somebody prior? Ric
Apr 27, 2017 @ 16:50:40
Richard,
I have no idea what the service history of this lens is, so I can’t say it was dropped or opened up before. I figure there’s nothing to lose at this point and it’s not like I am going to pop open my 600mm f/4 as my first lens repair attempt.
The one thing that’s not clear to me with the misaligned glass is the lack of problems on some frames. The only explanation is that there is some movement in the barrel and it aligns ok at times and then it doesn’t.
Recently I bought (and returned) a used Rokinon 24mm f/1.4 – it was so horribly decentered that it was completely useless. Focal plane went diagonal into the distance. However, that lens was bad, any aperture, any focal length. Very different with this lens.
The below image was taken minutes after the other shot with the problems I linked to above. Here the left side is fine

When it works, this little lens is incredibly sharp for it’s size and cost. Perfect for me to haul in a backpack to places I cannot bring the “good stuff” that’s either too valuable or heavy or both.
This variability and lack of noise that would indicate loose element suggests to me that it may be related to the moving parts of the lens, not something that has been knocked out of alignment permanently.
Anyway, I’ll probably take it apart, just as a learning experience, following your great instructions. I am not going to use it in its current state any longer.
Apr 28, 2017 @ 06:43:08
Hello, Peter!
Now, if the lens wobbles then there is a big chance that the elements are thrown off-axis and this is what is causing the uneven sharpness. I will admit that I am very forgiving when it comes to this and I do not even think about this at all due to the nature of what I usually shoot. Ric.
Oct 20, 2017 @ 11:55:42
Parabéns!!!
Ótimo Trabalho!!!
Ajudou muito para eu fazer esse serviço!!!!
Ricardo Yamada – São Paulo – Brasil
Oct 21, 2017 @ 12:26:03
Thank you!
Feb 01, 2018 @ 21:34:43
Hi
I just tried to fix the creep with help from your tutorial and I encountered a problem which you might be unaware off since you haven’t tampered with the felts in your lens.
I wasn’t adventurous enough to disassemble the lens completely so I only shimmed the felt in the front.
This removed zoom creep completely, however created a different problem.
When the resistance of both felts is different, the lens changes zoom when adjusting the focus, rendering any zoom setting other than 75 and 150 useless.
I have fixed the problem a bit by forcing a few shims out of thin foil into the second felt from the outside.
This however created its’ own set of problems: The movement of the barrel isn’t consistent. On certain focus settings there is much more resistance moving the barrel. Furthermore, while it seems that the shims are secure there is a risk that at some point they might fall out, or worse, into the barrel assembly.
Maybe you could add an additional disclaimer to your tutorial about this.
Thanks for your work.
Nov 05, 2018 @ 03:31:36
I want to thank you for your helpful lens repair guides. I tackled my 75-150 Series E armed with nothing more than your excellent directions and a decent set of tools. I wound up replacing the felt with some I got from a fabric shop. It was an 8X10 inch piece with an adhesive backing. I cut it to the proper width and installed it. I then put some white lithium grease on the helicoid, and now I have a smooth tight focusing lens with zero zoom creep. Couldn’t be happier. Next, I will wrk on my 100mm Series E I got dirt cheap because it ha oiling on the iris blades. Maybe by then I’ll try to go at my Tokina 17mm f/3.5 ultra-wide. I can’t find any repair info on that lens, but I figure after working on the others will help me figure out how to go at it.
Anyway, thanks again! Your website is indeed a godsend to tinkerers like me!
Nov 09, 2018 @ 00:36:30
Thanks, Jim! Glad you liked it!
Jan 08, 2019 @ 13:05:45
Depending its condition its possible to GENTLY buff up the felt strip damping the zoom ring with a suede brush – works a treat.
However a big problem I have is that having stripped down and reassembled, the focus compensator group seems to be out of whack and yaws alarmingly in and out of focus while zooming. I’ve checked everything from end to end several times to no effect. The group is one of the two (front?) with cutouts enabling them to mesh. Any ideas Ric/anyone?
Oct 29, 2021 @ 20:56:19
Good find Richard ! The 70-150mm-E was a darling of the fashion photography set in the 1970’s-80s before AF took off – as was the incredible lightweight polycarbonate Series-E 100mm F2.8. When tripods aand monopods aren’t allowed, the weight of a film-era manual zoom lens could be substantial and over a 60-minute show your arms got very tired !!! I have kept both since the very early 1980s and they work well today – near 4 decades later.
Both these two zoom and prime lenses could benefit from a good lens hood when shooting out of doors in dalylight or with strong lateral light sources in studios – this cuts back on veiling flare. Catwalk shots were terrible for that as they are brightly lit to avoid using flashes!
The Nikon 43-86mm was (and is) a joke lens – Vivitar made far better 35-70mm lenses if you really want one; Also – If you use Olympus cameras – the 35-70mm constant aperture F4 Zuiko is a really great lens (it was sold alongside a lower spec variable aperture version, so look carefully before bidding on eBay!),
The Zuiko 75-150mm OM lens should have been an equivalent to the Nikon E – but it is soft, low contrast and suffers from the cemented compound elements separating as it ages. If you must have one, look very carefully before buying.
May 09, 2022 @ 00:39:45
Hey Richard… I have an interesting question!
I would like to make my copy of this lens compatible with my F2S that only meters with non-Ai lenses…
I have a 55 f3.5 micro-ai that has the same f-stop range on its aperture ring, but also incorperates a metering prong.
I really only use this micro lens with my DSLR when I’m scanning my film or shooting very specific macro things… so I was wondering if you believe it would be possible to swap out the 55mm ring for the 75-150 series-E ring?
By the way, I’m also living in Tokyo and I love your blog!
Dec 24, 2022 @ 05:10:06
Loved readingg this thank you
Oct 29, 2023 @ 19:28:57
This was one of my favourite lenses especially when my kids were small and I used to shoot weddings. I loved it so much I even put a metal dog ears on it so I could use it on my Nikkormat. I also chipped it with a dandelion and still use it today on my digital cameras. I used to enjoy taking it hiking as it was very useful for doing close-ups as well as isolating subjects. It works well with a 4T or 3T close-up lenses as well. I enjoyed your review of it but I find my copy is sharper at 75 that at 150 but Stop down to F8. Both of them are very good. I fixed my Zoom creep with a piece of electrical tape on the underside of the lens which made a huge difference, and it no longer creeps.Regards Gerry😊
Jan 20, 2024 @ 04:13:58
Thank you for this detailed article. After reading it several times, I bought this lens “as is” for $5 and its only problem is the zoom creep, which I intend to fix with the help of your article.