
Hello, everybody! I’m very busy these days and I only got a good rest today. Today’s just another lazy Sunday and I was just listening to some oldies. Speaking of oldies and easy weekends, I will show you today a very good lens from almost 30 years ago but it’s still a pretty good lens for its price and since it’s a slow weekend for many, cleaning this lens is just as easy as going to the barbershop and getting a haircut (if you’re experienced).
Introduction:
The Tokina 28-70 AT-X PRO is a lens that I owned around 10 years ago and I sold it when I bought a Zoom-Nikkor 35-70mm f/2.8 AF lens. It was a very good lens and I loved using it on my Nikon D90. I shot pictures for billboards with that setup and it was a great lens for general photography. Here we are now almost a decade after and I missed the lens a lot so I bought another one for use with my film cameras because it has a real aperture ring unlike the current generation of lenses where there’s no mechanical aperture ring so it’s useless for use on older film cameras like the Nikon F3. This was a very sought-after lens back in the day and there were many versions of this lens. Every version is great except for the last one which was made with cost-cutting in mind hence the “SV” or super value specification on the name. The most desired version of this lens is the one featured here on this article and it was based on the legendary zoom from Pierre Angenieux. The zoom from P. Angenieux (Angenieux 24-70 f/2.6 AF) was considered to be excellent and common knowledge dictated that Tokina bought the rights to this lens but recent findings actually pointed that Tokina actually made the Angenieux 24-70 f/2.6 AF for the French company until its license expired enabling Tokina to use and modify the design for their own use.
 The Tokina 28-70 AT-X PRO is very well-balanced when joined with a heavy professional camera like the Nikon F4. The setup feels very balanced and inspires confidence. Shake is also reduced because of the weight and you can even shoot at slower speeds than usual.
The lens is quite complex and required 16 elements to make this happen. Other versions of this lens have slight or completely different optical formulas so this only applies to the version being shown here on this article. This lens was very popular back in the day, the competition from Sigma and Tamron was not as good when it comes to build quality and only Tamron’s offering bested it when it comes to image quality. Sigma sucked back then and their lenses were flimsy and terrible but things thankfully changed recently. Tokina ruled the 3rd party market due to its robustness and image quality, that still holds true to this day but Tokina’s rivals surpassed it in technology and image quality. That’s too bad.
Tokina’s build quality has always been very well-regarded but despite the “PRO” marker, this lens is susceptible to breaking when used by a pro in real harsh conditions. Careless and heavy use will break this lens in 2 as attested by Bjørn Rørslett. Thankfully, we aren’t using our lenses in the same capacity and environment as he does and this lens will last us all a lifetime if we take good care of it. Never let moisture into this lens because this is not a weather-sealed lens. Dust and moisture can get into this lens easily and it will make the inner elements dirty which is a common problem of this lens.
The Tokina 28-70 AT-X PRO is a very convenient lens to use. The focal range is great and the relatively-fast f/2.8 maximum aperture is more than enough for many things. The AF is also pretty fast and is still adequate in this era of super fast AF performance. Accuracy is also OK but may occasionally hunt in lowlight conditions when you don’t use any aids for autofocus like the lamps on your Nikon cameras and flashes. Having said this, it’s also dependent on the camera body you are using it with so pro bodies will perform better.


Here’s the difference between 28mm and 70mm. This makes the Tokina 28-70 AT-X PRO a very versatile lens for general photography. 28mm is wide enough for most things while 70mm is long enough to give you tighter frame with just enough compression. Notice the elements in the frame and see how things further away look smaller or bigger depending on which end of the zoom range you used. This is how compression works. You use your lenses like this and choosing the right focal length is essential for proper composition.
I always say that learning how a lens performs will help you maximize the lens better for different situations. Knowing when and what to shoot with this lens will help you make this lens work for you better. This lens has plenty of merits/flaws and I will show some of them here. You ought to know by now that I don’t shoot charts and I base my judgement on impression and taste. This is not a charts and numbers thing so if you are looking for something like that, you will be disappointed with my article. Go elsewhere for that.
The flare resistance of this lens is on the bad side. It’s very prone to flare and ghosting so you will want to use a hood with it. Make sure that your hood is wide enough or it’s going to vignetter at 28mm. I bought the ugly original hood as a separate accessory. The stupid thing about it is that you cannot use any filters while the hood is attached! You will have to install any filters first before you screw the hood on. This is very counterproductive.


(Click to enlarge)
The images above should give you an idea on how vulnerable this thing is to flaring and ghosting. All of these except for the first and last images were shot wide-open. The poor coatings of the Tokina 28-70 AT-X PRO is very apparent here. Stopping it down helps a bit as you can see in the first image. At smaller apertures, the blobs are reduced to points or streaks. You also get even-pointed sunstars because this lens has 8 iris blades. Nikkors of this era usually have odd-numbered iris blades so the sunstars look more organic. This is a matter of taste and it will also affect your bokeh balls’ shape. I personally prefer Nikon’s use of odd-numbered iris blades and I’m sure many people will agree with me on this.


(Click to enlarge)
Here’s another sample with that ugly rainbow streak. I covered the sun with my hand to act as a shade and the ugly streak went away and the contrast improved a lot. It was very windy that day so the lanterns were blurred a bit. These were shot wide-open by the way.


(Click to enlarge)
Now, lets look at how terrible vignetting is with this lens. Both images were shot at f2/.8 and they were both underexposed to exaggerate any vignetting. The left picture was shot at 70mm and the right one was shot at 28mm. Notice how terrible vignetting is on this? I also noticed that the left frame vignettes more than the right. This may be caused by the direction of the sun in relation to the frame but some lens do exhibit uneven vignetting just like this. Stopping-down the lens helps a lot and I assure you that you will not notice this very much when shooting in normal conditions. Like I said, this was underexposed by a couple of stops just to show you how the vignetting looks like.

It works as a short portrait lens on a Nikon D90.
 Distortion on the wide-end of the zoom looks like this. Notice that the horizontal lines at the top of the frame are now bowed. I am not liking this but if you know how to use this lens then you will learn how to frame your lines properly to avoid this. Zoom lenses tend to exhibit more distortion compared to prime lenses but this is a bit too much for me and I will not use this lens at 28mm for scenes with plenty of lines. Before I forget, also notice the vertical lines on the door’s frame and the tiles beside it. They are also curved a bit by the distortion. Knowing the lens’ weaknesses will help you use this lens more effectively.


(Click to enlarge)
Here’s some images shot at f/2.8, f/4 and f/5.6 respectively. These were all shot at 70mm to showcase the background blur better. At f/2.8, the subject is already reasonably-sharp. It has pleasing bokeh and the separation is good as expected. Stop it down to f/4 and you’re going to notice that subject is now VERY sharp and background is now less blurry. Bokeh is still smooth at this point. At f/5.6 most of the focus plane is already at its peak. Bokeh or background blur is also not as evident anymore due to the broader DOF. These pictures will give you an idea on which aperture this lens should be shot. I would use this lens at f/4 for portraiture so that the model has more things in-focus. You can shoot at f/2.8 and it will give you decent-enough to pleasing bokeh if that’s your thing. If it’s bright enough, I’ll use this lens from f/5.6 to shoot everything else like street or travel photography. I can be assured that I will get fantastic images at f/5.6 to f/8 because I see this as the peak for this lens as far as sharpness and contrast goes. You really can’t go wrong at these apertures.


(Click to enlarge)
The pictures above should give you an idea on the characteristics of this lens’ foreground and background bokeh. Lenses render foreground and background bokeh differently. It is pleasing enough for me but I was hoping that the foreground bokeh would look better. It is not really bad considering that it’s f/2.8, maybe I was just spoiled with fast primes.
 Since I do not have a model available, this Storm Trooper from Halloween will probably be OK to give you an idea on how this lens performs when used for portraiture. The lens was set to 70mm and shot wide-open for bokeh. You can see that it’s pretty good because the subject is pretty sharp and certainly more than useable. The background isn’t much so please excuse me excuse me for that. Trust me, I have shot with this lens for portraits many years ago and I will tell you that this lens is pretty good in or out of the studio.
All zoom lenses have a sweet spot when it comes to their focal lengths and this lens is no exception. What I mean by that is a zoom lens will perform really well on one end of its focal range and will usually have optimum performance in the middle of its focal range. In the case of the Tokina 28-70 AT-X PRO, its amazing at the widest end when it comes to sharpness and will gradually get a bit softer at the longest end. Depth of field may be the culprit here but I suppose that it’s the design because flare and other things get worse at 70mm. In my observation, 28mm is pretty sharp and contrasty but you get distortion and more flaring/ghosting because the front element is extended at this setting. 50mm is very good at all parameters. At 70mm, you lose a little bit of sharpness and contrast but this is as expected for a lens of this age but as you can see in the pictures above, it is still pretty good and this should not worry you at all. See my images below if this bothers you at all.


(Click to enlarge)
Here are some samples shot at 70mm and most were shot at f/2.8. The images look more than acceptable to me and it still has that “old lens look”. I usually use this lens at 70mm wide-open and while it’s not as good as the AF-S NIKKOR 24-70mm F2.8G ED that I owned it certainly is very good considering the price that I paid for this. We are now comparing an expensive recent lens to a cheap one from the early ’90s so this isn’t fair at all.
Now that we have seen what the lens can do at 70mm, let us now see some sample from the 28mm end of the zoom range. When it comes to sharpness, 28mm seems to be really good and I may even say that it’s the best in the focal range. While 50mm is just as great minus the distortion, it’s a little less sharp compared to 28mm. This is barely noticeable, I had to pixel-peep to see this and I was shooting at f/2.8 so this was expected. for all intent and purposes, you can even say that 28mm and 50mm are almost equal when it comes to sharpness. The 28mm focal length is one of my preferred focal lengths because it is not too wide like 24mm for general photography. Try it if you haven’t, you may like it.
 Pardon the missed-focus. I was trying shooting the lady at the center but my focus point’s position was locked to the center so the bottles at the back was in-focus. The bottles at the back are sharp considering that this was shot wide-open at ISO1600. All the customers at the front counter are blurred, leading your eyes towards the center of the frame.


(Click to enlarge)
Here are more sample images at 28mm. The distortion isn’t really noticeable when your frame doesn’t have horizontal lines towards the edges of the frame. Vignetting isn’t a big problem either when you set your exposure properly. I am loving the images so far and I would rather shoot with this lens than fuss about its imperfections.
Shooting this lens at f/4 is probably what I would mostly do because this lens is very good at f/4 and you still maintain the creaminess of the background. On a really sunny day, I’m more inclined to shoot this at f/5.6 to f/8 specially if I am using slower films. I used this on the studio a lot back in the day and this lens is great at f/8 when shooting at the studio.
The next sets of pictures were shot using a Nikon F6 loaded with Fujifilm Industrial 100. It is important for us to see how this lens performs with film because film has a unique and near-impossible to simulate look because of film grain. Seeing how a lens performs using film is important so we can judge a lens better because we can see how it renders under both mediums. I see film and digital as 2 different paradigms, one will never replace the other. Let’s observe the foloowing pictures.
 The wide-end of this lens is wonderful for taking pictures such as this, it’s handy using it for taking travel photos.
 You’ll have to be a bit careful with depth-of-field as even the 28mm end can blur things that aren’t on the focus plane at f/2.8. I focused on the poster but the menu is blurred just a bit as a result. Shooting this at f/4 or smaller should fix this.
 Stopping the lens down to f/5.6 should take care of the vignetting in the wide-end and it’s also going to give you sharp photos. This is what I would use for taking photos like this if I can get away with it, if I don’t have enough light then I will just shoot wide-open.
 You can see some ghosting near the lower-edge of the frame. If you like putting the sun in your frame as an element then you will have to consider your positioning carefully.
 The quality of the bokeh isn’t terrible at all here but you will notice some edging effect on the balls. There is a bit of flare on the frame and using the pathetic hood may help but it’s too shallow to be helpful in my opinion.
 Contrast looks nice and the saturation is certainly more than adequate wide-open. I don’t see any chromatic aberration so far in the areas with higher contrast.
 My focus was a bit off here, I think the camera focused on the umbrella instead. You can appreciate how sharp this lens is at the 70mm end, the colors look great, too.
 The long-end of the lens is handy for framing your subjects tighter due to compression. If I used a wider focal length then I can’t compose these 3 ladies like this and the one closer to me will look bigger due to the effects of foreshortening.
 The resolution at the edge seems decent with film, it’s more forgiving compared to digital because film grain can sometimes mask a lens’ flaws specially if the film has bigger grain like what we are using. Some films have super-fine grains that resemble digital cameras in the sense that it renders fine details with fidelity, Fujifilm Acros 100 is one such film.
 It would have been lovely if I had an 85mm lens with me but 70mm is just fine. Changing lenses can cause you to lose a shot at times so you use zoom lenses for convenience.


(Click to enlarge)
Here’s the rest of the set and click on each photo and observe how this lens renders. This is a great lens and its rendering looks natural so far in the sense that we don’t get photos that look too “processed” in the sense that the lens is over-corrected and we get pictures that look “too clean”.
Now that you have seen how this lens performs, you may be asking yourself how does it compare to the Nikkors in this category. Surprisingly, not really bad at all.
Zoom-Nikkor 35-70mm f/2.8 AF/D:
- You get 28mm while the Nikkor only goes to 35mm.
- AF is a bit faster.
- The Nikkor has overall a more pleasing rendering of the image.
- The Nikkor has less distortion.
- This Tokina the standard 77mm filters.
- The Tokina doesn’t have a rotating front.
- The Nikkor has a push-pull design for the zoom cam.
- The Nikkor is smaller and lighter.
AF-S Zoom-NIKKOR 28-70mm f/2.8D IF-ED:
- The Nikkor has better AF in all regards (but has flimsy AF motor).
- The Nikkor is much bigger and heavier.
- The Nikkor is much more expensive.
- The Nikkor is optically better, you get what you paid for.
AF-S NIKKOR 24-70mm F2.8G ED:
- The Nikkor is much more expensive.
- The Nikkor is has very good optics.
- The Nikkor is bigger and heavier.
- The Nikkor has amazing AF performance (very reliable).
- The Nikkor has a tendency to develop a stiff zoom and helicoid (expensive repair).
Considering that this was introduced in the early ’90s, this lens is still great. It may not be as good as the later Nikkors from the 2000s but that is expected. You can’t compare your VW Golf to today’s cars, it’s just not fair but I bet that the old Golf is still capable and fun. If you stop the lens down to f/5.6-f/8 then the difference becomes even less apparent.
That’s it for the introduction! This is already becoming a review instead of an intro for a lens repair article. We are not in the business of making lens reviews.
Before We Begin:
If this is the first attempt at opening a lens then I suggest that you read my previous posts regarding screws & drivers, grease and other things. Also read regarding the tools that you will need in order to fix your Nikkors.
I highly suggest that you read these primers before you begin (for beginners):
- Essential tools
- Best practices 1
- Best practices 2
- Best practices 3
- Ai conversion
- Working with Helicoids
Reading these primers should lessen the chance of ruining your lens if you are a beginner. Also before opening up any lens, always look for other people who have done so in Youtube and the internet. Information is scarce, vague and scattered (that is why I started this) but you can still find some information if you search carefully.
I highly recommend that you also read my working with helicoids post because this is very important and getting it wrong can ruin your day. If I can force you to read this, I would. It is that important!
For more advanced topics, you can read my fungus removal post as a start. This post has a lot of useful information here and there and it will be beneficial for you to read this.
Disassembly:
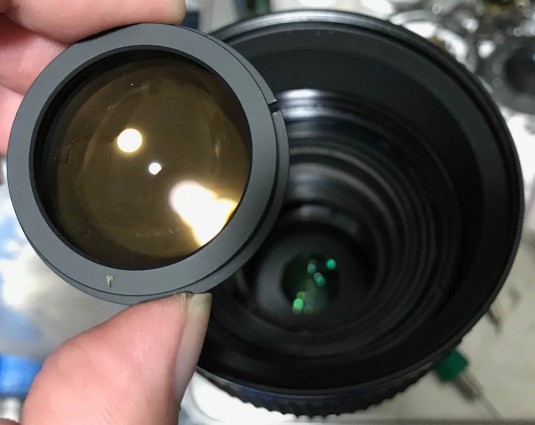
The lens is prone to accumulate dusts and crud in the middle elements due to the pump action when you zoom in and out. There are also many places where junk can come in so many lenses found in the used market are dusty inside. Another problem for this lens is its tendency to develop a film of haze in the inner elements. This haze can be anything, it is usually evaporated lubricants settling on the surface of the glass which you will need to clean as soon as possible before it etches the glass. Another is fungi because the glass at the center is vulnerable when you pump air in and out as you zoom. Finally, cemented elements may develop balsam separation which is kind of common with this lens. Haze is more likely than balsam separation but I have seen samples of this with that problem so it can happen. Check the lens very well before you buy purchase it, caveat emptor!
My article will show you how to clean these common problems (if cleanable). Any issues with the barrel isn’t covered here but thankfully, mechanical problems are rare with this lens since they’re built very well and there aren’t many electronic parts that can fail. This is an easy job for me and it took me less than 30 minutes to do this. If you are new to this, send this lens to a real repairman because you will need the right tools for the job!
 With a rubber cup, carefully remove the name ring. It can be very delicate because it is a cheap plastic part. This part may be glued or secured with lacquer and if yours is hard to remove then try and put a drop of alcohol at the seams. Let that sit and work on the glue before you attempt to remove it again. The key here is to be very careful and patient.
 The name ring comes off just like this. It’s not really grippy at all so you may have to use a little bit of effort to get this off using your rubber cup or stopper. The best way to access this is to set the lens to 28mm and manually focus the lens to 0.7m. This’ll extend the lens so that the front is easier to reach. Be careful of the front element while working on this.
 Now that the name ring is gone, the front elements group can now be removed safely. It’s being secured by the name ring and it’s also being secured by some glue or lacquer. Use a rubber cup to remove this just like you did the name ring. Make sure that your tools will never ever come into contact with the front element or else you risk damaging it.
 The central floating elements group can be removed using a spanner that is long enough to reach this thing. It’s deep inside the lens so you will need the right tool for this. Extract this with a lens sucker once it has been unscrewed. Don’t drop this thing to the floor!
 And here it is! Putting this back can be tricky as you will have to position this carefully in the barrel. Be careful not to cross-thread this while you screw it back into place. That’s all when it comes to the elements that you can access from the front, let’s move to the rear!
 Removing the rear element is easy if you’re lucky because it extends well beyond it’s own baffle. If you use a rubber cup that is small enough to fit on the rim of the rear elements group, you can loosen it enough for you to pick it up with your fingernails. If you want to do a proper job then you will have to carefully remove the rear bayonet mount. You will have to remove the screws that hold the contact block first and then remove the screws for the bayonet mount next. I will not show you how to do this because there wasn’t any need for me to do this in the first place. If ever you needed to do this with your lens, all I have to say is be careful and go about slowly to avoid damaging the electronics.
 Finally, the rear floating elements group can be removed using a spanner. I did not have to remove mine because mine is clean. All I needed to do was to blow some air.
There you go. It’s easier than I expected. I was scared that this will require me to pull this lens apart but thankfully it wasn’t as bad as I expected and I didn’t need to open any cells to access the elements individually to clean them. I just wiped the haze away with tissue saturated with alcohol and then follow up with naphtha and a clean lintless cloth. Blow some air to remove any fibers and I’m done. It’s now very clear and I’m satisfied.
Conclusion:
I usually don’t cover off-brand lenses but this lens is too good not to make an article of. I will only do anything that has anything to do with Nikon and this falls into that category. I enjoyed working with this lens and I learned a bit while doing this. Again, I will never tell a beginner to do this on their own because you will need some specialized tools just to open or extract some things here and a careless slip of the wrist will end up in disaster so just send this to a trusted repairman like David Hilos. The purpose of this article is for you to know how things are done and to see whether your repairman has screwed-up or not. There are many cracks out there and it will do you good to ask around first.
 Here it is! The Nikon Df is really small when compared to the Tokina 28-70 AT-X PRO. It is front-heavy with this setup and I imagine that this will handle a lot better on a bigger pro camera body. It focuses fast enough with the Nikon Df and the Nikon D4.
We have now reached the end of another article and I hope that you enjoyed this article. I’m currently very busy with many things so I chose to write a shorter article this time. I am pretty sure that there are many Tokina 28-70 AT-X PRO owners out there who wants to clean their dusty lens so I hope that this reaches them in time. The other versions are similar to this lens in terms of engineering so I suppose that this guide will also be of use to them. There aren’t many people talking about how to fix this lens so hopefully this will become a welcome addition to what’s available online as far as lens repair articles go. It’s very important that people talk more about this lens because I believe that this is really a great option when it comes to cost/performance. It’s an old lens that is still relevant today and despite its flaws it can still take great pictures. See you guys again next time! Ric.
Help Support this Blog:
Maintaining this blog requires money to operate. If you think that this site has helped you or you want to show your support by helping with the upkeep of this site, you can simple make a small donation to my paypal.com account (richardHaw888@gmail.com). Money is not my prime motivation for this blog and I believe that I have enough to run this but you can help me make this site (and the companion facebook page) grow.
Leave me some tip?
Thank you very much for your continued support!
$2.00
Helping support this site will ensure that this will be kept going as long as I have the time and energy for this. I would appreciate it if you just leave out your name or details like your country and other information so that the donations will totally be anonymous it is at all possible. This is a labor of love and I intend to keep it that way for as long as I can. Ric.

Jan 30, 2019 @ 12:15:14
Hi Richard sorry for my question i’ve a Tokina 19-35 3.5-4.5 its very good lens for my d600 Nikon now i’m search a lens hood bh-774 but unfortunately i don’t found anything on web…..mmmhhhh have you possibility to find one in Japan?? many thank’s Mario
Feb 03, 2019 @ 10:10:32
Found one in USA used but very nice Thank’s
Apr 13, 2019 @ 18:48:52
Hi, could you tell me how to set the focus infinity calibration on this lense? I have little backfocus on mine and wonder how i could repair it.
Thanks.
Apr 22, 2019 @ 06:11:51
Hi frequent visitor to your awsome site ,i have recently bought this lens and i,m having problems with infinity focus on my D700 and D7100 the lens will not find focus beyond 35ft and will not reach infinty in manual focus ,any ideas ?
Jul 16, 2019 @ 08:33:17
Hi Richard,
I have the same lens and on my F80 and D7100 it won’t focus. Any ideas or tips? Is it worth going to some service to fix it?
Thanks!
Nikos
May 26, 2023 @ 15:23:16
hello, Richard.
i got this lens recently, and i found fungus in front elements.
front elements could be disassembled and cleaned? i couldnt find repair information of this lens, so i cannot start cleaning.
thank you.
Jun 13, 2023 @ 20:50:17
Hi,
Same question concerning fungi on the front element.
Best,
Samuel
Sep 09, 2023 @ 22:45:12
Hi Richard, did you apart Tokina AT-X 50 250mm f 4-5.6 Ai lens for Nikon before? Mine get fungus in the front elements.
Jan 12, 2024 @ 08:42:13
Is the nameplate screw in or pressure fit? Please, cannot get past step one.
Jan 23, 2024 @ 07:12:04
Dear Richard, I have several years a later tokina 28-80mm f2.8 af atx pro.Past year noticed( in blue light test ) some condensation on the back of front element and much heavily on the back of front group.In past 6 months I googled but not found a way to approach easily the front group for cleaning.If your meet this lens or know how to proceed please help me. Thank you.